Deleted
Deleted Member
Posts: 0
|
Post by Deleted on Aug 28, 2016 18:58:46 GMT
Following on from a comment jello made in another thread I thought it might be interesting/useful to show just what's possible with the subtle use of software. The image below is directly how it came out of the camera. Well, not exactly. I shoot in RAW and had to convert it to a JPEG to post on this forum, but there have been no adjustments, no tweaks. This is pretty much exactly what the camera sees. 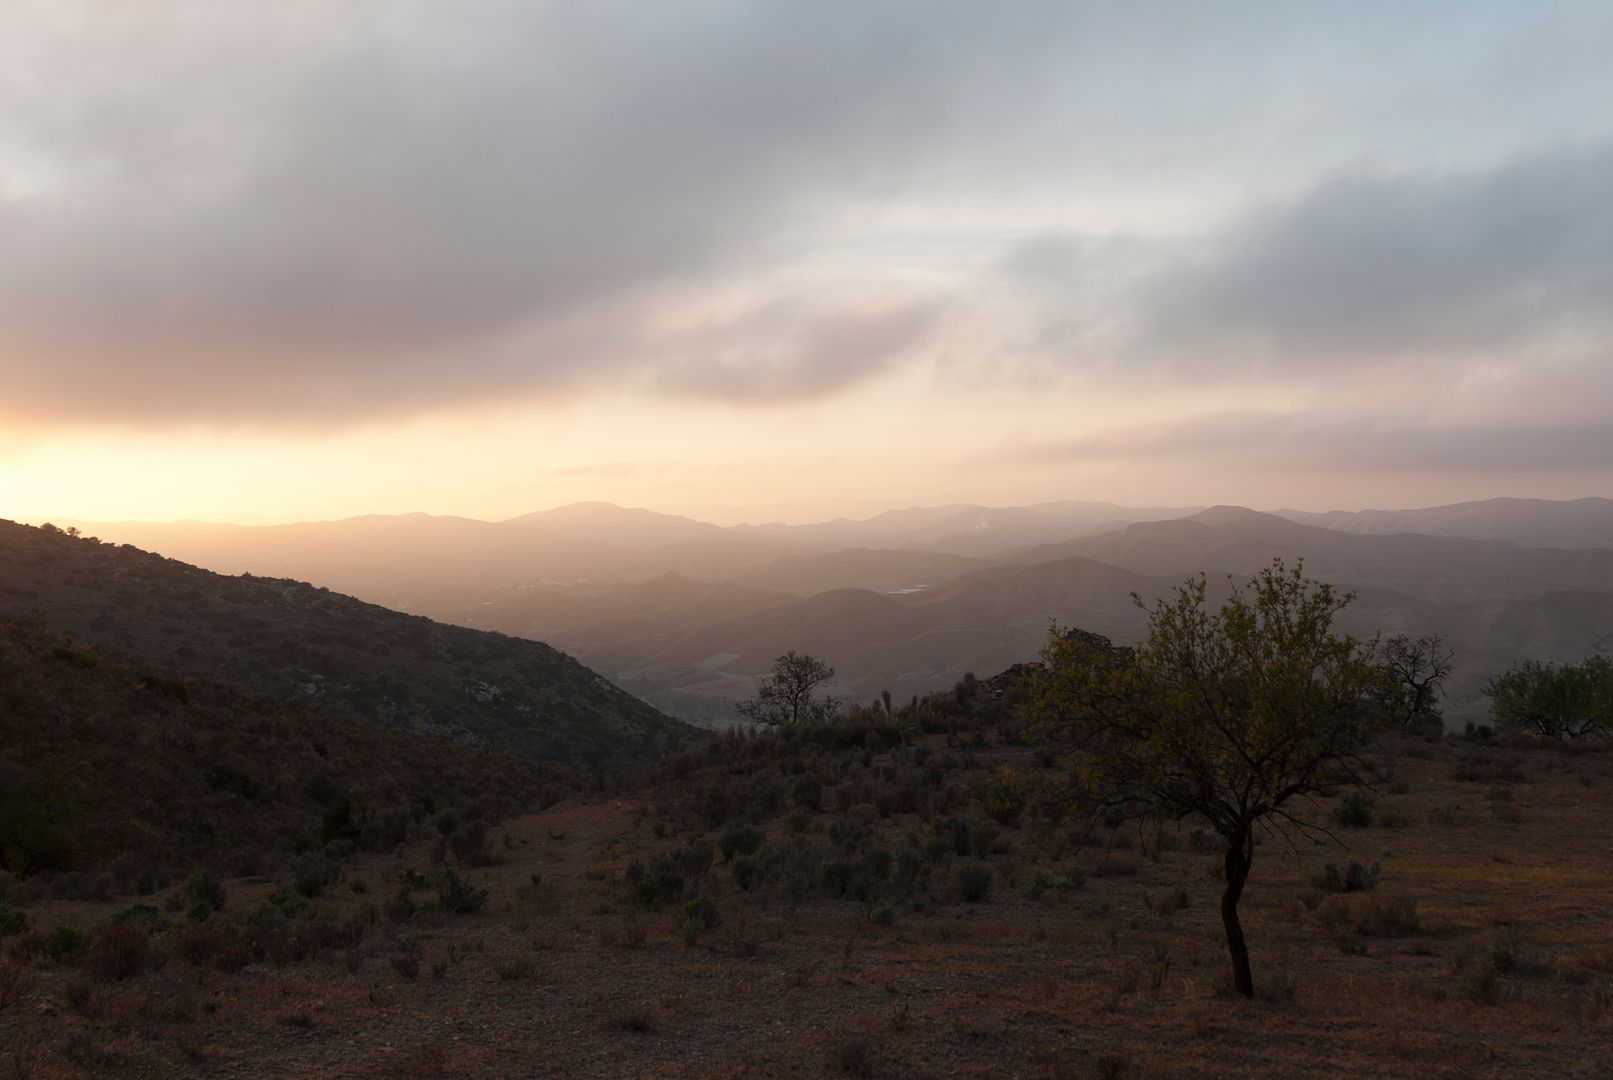 As you can see, the image is basically sound but it doesn't pop (industry term for va-va-voom). If I had used a tripod and a decent ND Graduated filter I could have pulled the light in the sky down to a level which would have matched the ground. A tripod is required for this because I'd need to use a much slower shutter speed and without a tripod camera shake would make the image rubbish. But this is a JPEG, as I mentioned earlier. When you take a photo there's what your camera sees and then what your camera outputs. Not the same thing. In order to make consumer shots usable by printers or online in forums such as this the camera needs to perform some magic and so converts the image to a JPEG using set algorithms for landscape, portrait, sports, et al. Shooting in RAW by-passes the cameras 'brain' altogether. No matter how good the camera it can't come close to what can be achieved by judicious use of Photoshop (other software is available, but it's crap). So I just load the file into Adobe Camera Raw, do some subtle tweaks to the initial image, then pass it on to Photoshop. In PS I tend to use plug-ins these days. I do know how to do it the hard way but modern plug-ins do the job far better & with much less hassle. The really important thing to remember is that, in the next image, I have added nothing. Everything that's in it was in the original capture. Photoshop just allows me to bring it out. Think of it like comparing a 128k mp3 file to a WAV or FLAC. It's much the same thing, only I get to decide how much I bring out & how much I repress. So here's what I end up with.. 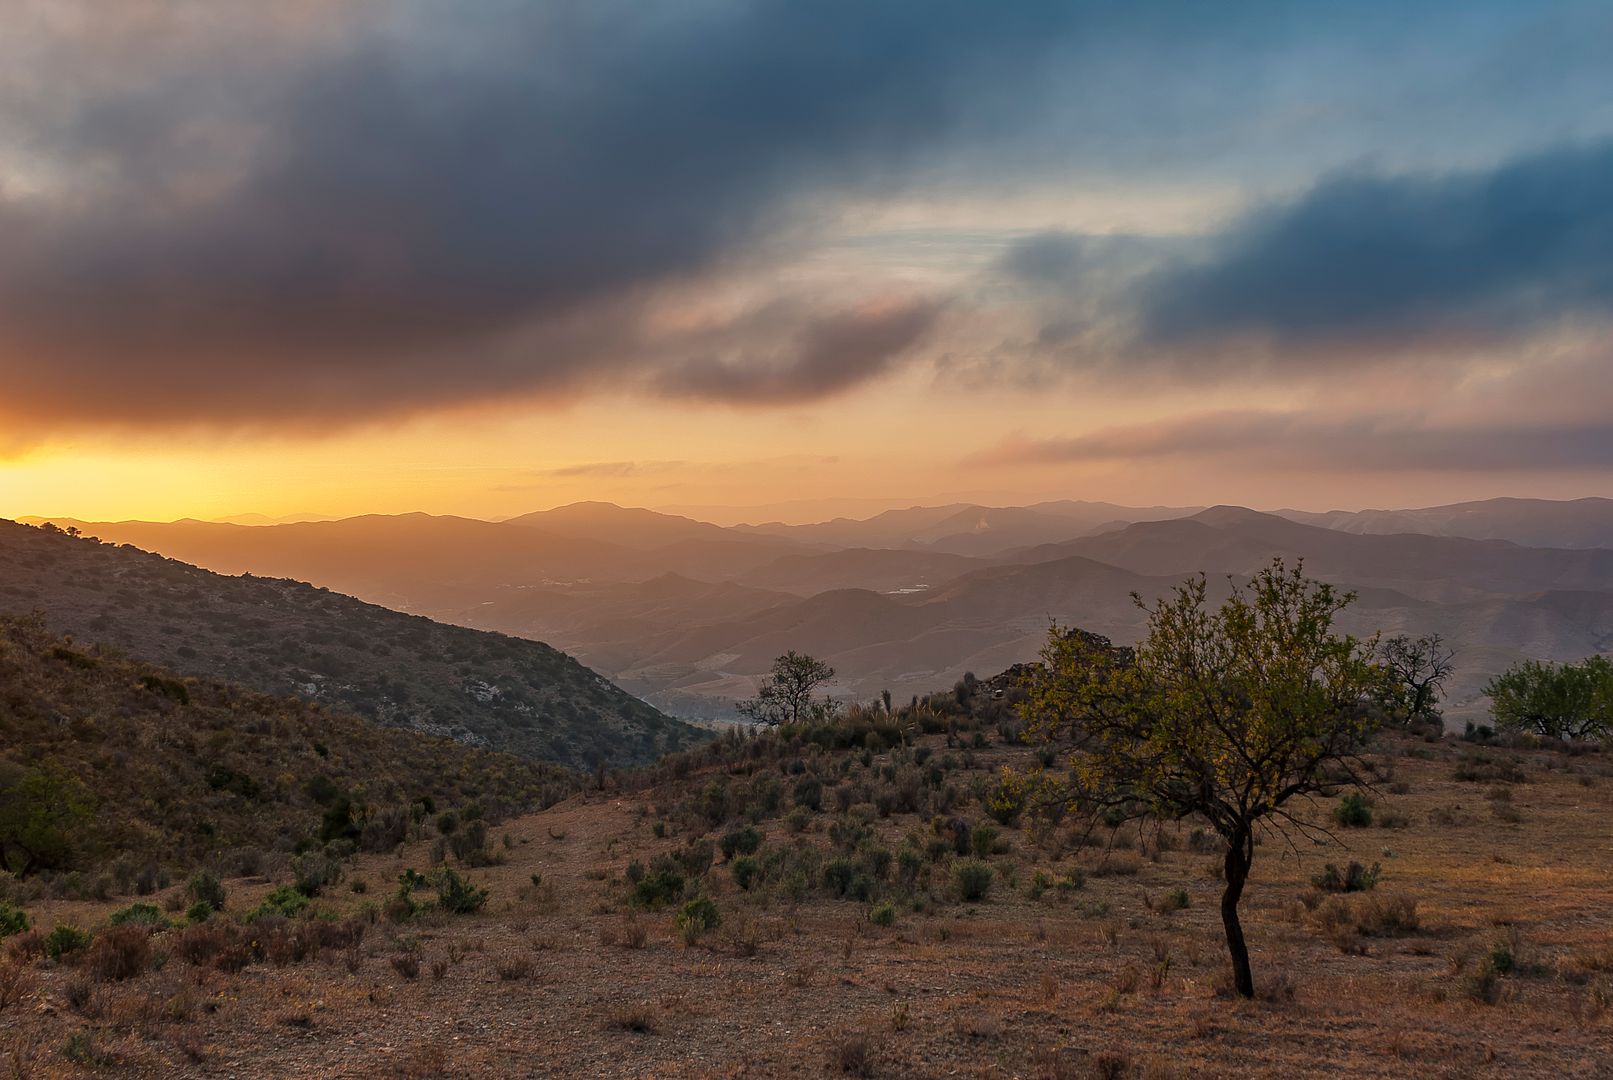 Take note. The detail in the foreground was already there. The colour in the sky was already there. I'm not an expert so sorry if this is a bit confusing. There are many things that Photoshop can do but where I wouldn't know where to start. Also, some say this is cheating and in a way they're right. A good film camera and decent filters along with some proficient work in a darkroom would yield even better results. But who's got time for that these days. Be aware, you will hardly ever see a photo online that hasn't been through Photoshop at some point, even if only for cropping & sizing. |
|
|
|
Post by marveltone on Aug 29, 2016 2:33:35 GMT
I agree that post processing can make a big difference in the final outcome. I don't own a dedicated camera or Photoshop, but I've had pretty good success with my smartphone and an app called Snapseed. A decent amount of corrections and filtering can be had in a free app.
In the end, it can't make up for poor composition when you snap the picture, but a little tweaking goes a long way when it's decent to start with.
|
|
Rabbit
Administrator
Posts: 7,087
|
Post by Rabbit on Aug 29, 2016 7:05:53 GMT
If you expose for the sky, then detail isn't burned out, allowing you to highlight the lowlights later without having 'white out' areas in the sky with no detail. Some don't like it because it doesn't always look like the original scene but it's the best way to capture all the detail. (A bit like compression with music does the same thing)
One switch that I always check with my photos is the 'levels' switch. Some call it a 'histogram'. You can then spread the contrast values out in order to get a full range displayed which really can make the picture 'pop' tonally.
If that doesn't work so well, then sometimes the land area below the sky has to be separated and lightened on its own without touching the sky, but that can be tricky and very often, the border between the adjusted section and the area left can be obvious.
The levels/histogram adjustment along with a slight amount of 'unsharp' mask can be the most useful two buttons on photo software.
Sometimes, the computer screen needs to be 'calibrated' since if you send your adjusted photos off to be printed, the returned prints can look a bit different though. Luckily, most computer screens these days are pretty good though.
Talking about photos being adjusted on computers ...... I've just edited a short piece of movie footage taken in Florida. It's high definition video so takes an awful lot of computing power. (Sharper than normal tv). Big pain though, is that the editing is easy, but the ripping takes forever and basically ties your computer up for a long time.
My most recent film has been ripping for 14 hours!!!!
Once done though, the quality is amazing.
|
|
Deleted
Deleted Member
Posts: 0
|
Post by Deleted on Aug 29, 2016 9:48:04 GMT
I agree that post processing can make a big difference in the final outcome. I don't own a dedicated camera or Photoshop, but I've had pretty good success with my smartphone and an app called Snapseed. A decent amount of corrections and filtering can be had in a free app. In the end, it can't make up for poor composition when you snap the picture, but a little tweaking goes a long way when it's decent to start with. Snapseed is the only photo app I use. It's made by Nik software (recently gobbled up by Google), the same people who have now made the entire Efex series of plug-ins available for free. With these plug-ins almost anything is possible. Anyone using Photoshop and NOT using these plug-ins is mad. Nik Collection |
|
Deleted
Deleted Member
Posts: 0
|
Post by Deleted on Aug 29, 2016 9:53:44 GMT
If you expose for the sky, then detail isn't burned out, allowing you to highlight the lowlights later without having 'white out' areas in the sky with no detail. Some don't like it because it doesn't always look like the original scene but it's the best way to capture all the detail. (A bit like compression with music does the same thing) One switch that I always check with my photos is the 'levels' switch. Some call it a 'histogram'. You can then spread the contrast values out in order to get a full range displayed which really can make the picture 'pop' tonally. If that doesn't work so well, then sometimes the land area below the sky has to be separated and lightened on its own without touching the sky, but that can be tricky and very often, the border between the adjusted section and the area left can be obvious. The levels/histogram adjustment along with a slight amount of 'unsharp' mask can be the most useful two buttons on photo software. Sometimes, the computer screen needs to be 'calibrated' since if you send your adjusted photos off to be printed, the returned prints can look a bit different though. Luckily, most computer screens these days are pretty good though. Talking about photos being adjusted on computers ...... I've just edited a short piece of movie footage taken in Florida. It's high definition video so takes an awful lot of computing power. (Sharper than normal tv). Big pain though, is that the editing is easy, but the ripping takes forever and basically ties your computer up for a long time. My most recent film has been ripping for 14 hours!!!! Once done though, the quality is amazing. Indeed, always expose for the highlights because once they are blown-out they can never be recovered. |
|
Deleted
Deleted Member
Posts: 0
|
Post by Deleted on Aug 29, 2016 9:56:43 GMT
Here's a quick sharpening routine for use in Photoshop. I say quick but it's obviously not. However it can be recorded as an Action and used in a moment.
1. Duplicate Image and rename( to rename double click on layer 1 text ) “Sharp” ( cmd + j )
2. Open Channels and with RG channel active ( click r shift click g channel ) hold down Cmd key and click the RGB channel. This loads a selection which is a grey scale on the image.
3. Click the “Mask” icon at the bottom of the Channels pallete which saves this selection as a separate channel.
4. Go to Image > Select > Deselect or use keyboard shortcut of “Cmd + D”
5. Click the new Alpha channel to make active and goto Image > Adjust >
Invert ( cmd + i ). This inverts the image similar to a negative.
6. Go to RGB channel and holding down the Cmd key click the new alpha
channel mask to load this as a selection over the RGB channel.
7. Hold down Cmd key and click the H on the keyboard, which hides the selection
8. Goto Layers Palette and ensure that “Sharp” layer is active. Then go to Filter > Sharp > Unsharpen. Have Amount at 500%, Radius at 1 and Threshold at 0 and apply.
9. Hold down Cntl key and click the D on the keyboard, which deletes the selection which was hidden.
10. Reduce the opacity of the “Sharp” layer to suit.
My Nikon D200 tends towards softness so, as long as it's a landscape, I can usually get away with 500%. Portraiture I can only use 200% max. YMMV.
One more thing I always do on landscapes is to run Dfine. Clears up skies very nicely with virtually no break-up.
|
|
|
|
Post by hifidez on Aug 31, 2016 8:50:45 GMT
Great thread. Agree with all that's said. Brief for now but will join in later. Important to accept that in the old days of silver film you began your 'post processing' as soon as you selected your film. Did you want a Kodak result or a Fuji result? Agfa, GAF, Ilford? All films were designed with their own characteristic curves, colour balance, sharpness and so on. Plus if you were a DIY'er then darkroom techniques were all about controling highlights, shadows and contrast. Dodging and burning pretty much essential skills. Anyone who supports 'leaving digital pictures alone' is less than correct in my opinion.
|
|
Rabbit
Administrator
Posts: 7,087
|
Post by Rabbit on Aug 31, 2016 10:08:47 GMT
I used to love the slightly brown tinge of Agfa slides and then I'd make cibrachrome prints myself at home. Even took a load of super 8 cine film which looks so rough by today's high definition standards.
Been editing movie footage since I got home and just a 15 minute clip takes an old banger computer a whole day to render to HD. Results are pretty amazing though.
|
|
|
|
Post by drumdrym on Sept 5, 2016 21:03:06 GMT
Paps of Jura from Port Askaig, Islay Scotland taken around midday last Sunday, camera Canon Powershot, jiggled a bit in PS CS2 and why not.......... Click on pic for full screen  |
|
Deleted
Deleted Member
Posts: 0
|
Post by Deleted on Oct 10, 2016 23:46:18 GMT
As much as I love getting out and taking the photographs themselves I really do enjoy getting a good image into PP and seeing how much better it can become. The biggest problem with digital photography has always been the lack of dynamic range as compared with good low ISO film. That problem has largely been overcome by the curent full-frame sensors used in the high-end cameras but for those of us on a low budget it's just something to be lived with. The good thing about shooting in a RAW format is that detail in the shadows can be recovered to a remarkable extent in Adobe Camera Raw. The downside is that blown highlights remain blown. you can't puut back what wasn't there to begin with. Living in Scotland was terrible in that regard. Skies were often grey and so when the image was composed for detail in the landscape it left a flat, uninteresting sky. France hasn't given me nearly so many problems in this respect although, to be fair, it's been summer and wall-to-wall blue skies which, while still boring, are at least nice. Anyway, check out this image I took on my Panasonic DMZ150. It shoots in RAW which is just as well because this image would have been binned otherwise. This is just a straight JPEG conversion from RAW with nothing tweaked..  As you can see there's no detail in the shadows but as I said above that's not the biggest problem as shadows are recoverable (to a certain extent). The big problem for me is the sky. It adds nothing to the image and in fact only serves to highlight the lack of detail below. So I cropped it to a 16:9 format (good for wallpaper). It helped a lot but there was still some sky showing through. The Clone Tool is your friend. I don't use it often because it can take forever to make the transitions smooth but I got it right first time in this shot. All that was left was to boost the shadows, increase the warmth and introduce a bit of Glow. Although the glow adds to the romantic feel it's real purpose is to mask the grain that's always visible in boosted shadow shot taken with the Panny. The sensor simply isn't big enough to capture all the detail without also introducing lots of digital noise. It turned out not too bad I think..  |
|
|
|
Post by hifidez on Oct 11, 2016 13:01:50 GMT
Not great art but a shot I took last week during a walk to the next village. Very overcast day. First image is from the RAW and unprocessed, straight-from-the-camera image. 2nd image is the more presentable (I hope) 'developed' picture. In Adobe's Photoshop Elements / Camera RAW I tweaked the exposure and expanded the dynamic range. I then ran it through the Alien Skin film emulator followed by some dodging and burning to bring out certain highlight and shadow areas. Mkaes a dull image just that bit more attractive. Oh, and I cloned and copied in a few more flying birds above the church tower :-)   |
|
Deleted
Deleted Member
Posts: 0
|
Post by Deleted on Oct 11, 2016 13:11:52 GMT
Nice work! It's amazing how much detail has been recovered in the tree-line eh? An ND Grad might have helped the sky though as - to me anyway - the image is still a bit top-heavy. Actually, it's not top-heavy because the foreground is brighter to compensate but if you'd put a grad on the sky there would have been less need to brighten the foreground.
This is all just my opinion mind, I'm not trying to tell anyone what's right, just what I myself prefer. I should also say I'm not one for accuracy at all costs. Whatever looks right (to the photographer) is right, in my opinion.
I do have one question though - what happened to the birds?
|
|
Deleted
Deleted Member
Posts: 0
|
Post by Deleted on Oct 11, 2016 13:15:21 GMT
If anyone wants the very best plug-ins for Adobe products go HEREThe Nik Collection is an outstanding array of easy to use tools for the photographer. Once installed they can be accessed from the Filter menu. |
|
|
|
Post by hifidez on Oct 11, 2016 14:25:26 GMT
Nice work! It's amazing how much detail has been recovered in the tree-line eh? An ND Grad might have helped the sky though as - to me anyway - the image is still a bit top-heavy. Actually, it's not top-heavy because the foreground is brighter to compensate but if you'd put a grad on the sky there would have been less need to brighten the foreground. This is all just my opinion mind, I'm not trying to tell anyone what's right, just what I myself prefer. I should also say I'm not one for accuracy at all costs. Whatever looks right (to the photographer) is right, in my opinion. I do have one question though - what happened to the birds? Agree with about the sky. I could have darkened it a touch, keep a bit more detail. The finished image is, of course, just 'version 1' if you like. When to stop? The point of this post though was to show how a dull image with little contrast or colour is just the raw material for what it may becaome. The birds? In the RAW image ther's just one bird over the church tower. I made them 4. Better to have had 3 or 5 I suppose. |
|
Deleted
Deleted Member
Posts: 0
|
Post by Deleted on Oct 11, 2016 15:12:36 GMT
Nice work! It's amazing how much detail has been recovered in the tree-line eh? An ND Grad might have helped the sky though as - to me anyway - the image is still a bit top-heavy. Actually, it's not top-heavy because the foreground is brighter to compensate but if you'd put a grad on the sky there would have been less need to brighten the foreground. This is all just my opinion mind, I'm not trying to tell anyone what's right, just what I myself prefer. I should also say I'm not one for accuracy at all costs. Whatever looks right (to the photographer) is right, in my opinion. I do have one question though - what happened to the birds? Agree with about the sky. I could have darkened it a touch, keep a bit more detail. The finished image is, of course, just 'version 1' if you like. When to stop? The point of this post though was to show how a dull image with little contrast or colour is just the raw material for what it may becaome. The birds? In the RAW image ther's just one bird over the church tower. I made them 4. Better to have had 3 or 5 I suppose.Nice trick. I'll bear that in mind. I sometimes end up with three or four versions of an image and if I can't decide what's best I'll shelf it and come back to it later. |
|


